Thursday, August 11, 2011

Perseids Meteor showers peak this weekend!

The annual Perseids Meteor Showers is happening this week! So get out your tripods, get a cup of Tim's, and go shoot them! Here's some tips on how!

Pre-Shooting Preparation:
Charge your batteries fully before going out. It might be a bit colder at night, and that can affect battery life. Wear some warm clothes, a hat, and gloves. Bring some hot beverages, some friends, and make it a fun outing! At least you'll have someone to talk to between exposures.
Also bring a flashlight or LED keychain light so you can see what you are doing when changing your settings. A headlight looks dorky, but it let's you works with both hands.

Time to Go Out:
Here's the problem. They are best viewed after midnight, with 1-2am being the prime time. There could be as many as 50-80 meteors per hour. The peak nights will be Saturday and Sunday after midnight.


Where to Go and Sky Conditions:
You want to be as far away from the City/Town as possible to reduce the amount of light pollution. Find a dark road out in the country somewhere far away from street lights.
Obviously it has to be a clear night that you can see the sky.

Finding the Meteors

You should be able to see lots of meteors looking to the northeast.


Do I Need A Tripod?
YES and the heavier the better!

ISO:
Start with 400 ISO and see how much detail you can pick up. If you aren't getting enough details, try 800 ISO.

Lens:
You want to use a wide(16-35mm) to normal lens(50mm) so you can get a wide range of sky area. 


Shooting Mode: Has to be MANUAL as you need to set the shutter speed and aperture.
 
Shutter Speeds:
The longer the speed you use, the more meteors you will get. However, if you go too long, the stars will begin to form trails.
To figure out how to long to shoot the stars without getting trails, you can use this general guide.
Divide 600 by the length of your lens, and that is how many seconds you should use. For example, if you are using a 17mm lens, 600/17mm= 35 seconds.
However, if you do long exposures like 30minutes to 1 hour(or longer), you will get star trails that look neat along with the straight lines of meteors. The photo above was done for three hours(although you can see the light pollution made the sky brownish instead of black!) Note you will need a cable release or remote, and use BULB mode to do this. No way you can hold the button down for 1-3 hours...
NOTE: Many digital cameras will max out the shutter length at 30 minute to prevent overheating and damage..most likely that will be the longest you can do.

Aperture:
Use your widest aperture (smaller number, for example 3.5/4.5) to let in as much light as possible. If you find the meteors coming out a bit bright, you can stop down one setting. If you have a lens that has a really wide aperture(1.8/2.8) that is even better!

Focus:
You have to use MANUAL focus and focus on the stars or set the focus on the lens to Infinity.


White Balance:I would suggest shooting RAW, and then playing with the white balance if needed. Had I shot the one at the top raw, I could have switched to TUNGSTEN/INCANDESCENT balance to correct for the orange. 
If you are shooting JPEG, do a test using DAYLIGHT/FULL SUN and see how it looks. If you do have things lit up by ambient light around you(like street lights, etc) you may want to use TUNGSTEN/INCANDESCENT instead, but it could make the sky go a bit too blue.


Other Shooting Tips:
-If you want to include trees, mountains, the horizon, etc they will provide an interesting silhouette shape and scale.
-You could also try using a flash during the exposure to light up the trees!
-Have an old film camera kicking around? Haul her out, throw in some ISO 400 film, and take some long exposures!(You have to have to use a cable release)

So go out there, have some fun, and send me some great shots or post them in the online student galleries if you have a login!


Hope you get clear skies!

Noel Chenier


Monday, July 25, 2011

Fun with Sparklers!

With New Brunswick Day(or whatever Province-you-are-in day) coming up, I thought I'd share some tips on getting some interesting images with sparklers!


Thursday, July 14, 2011

Shooting Video with a DSLR...First Thoughts!


As the Telegraph-Journal revamps our online presence, it has been determined that we need to incorporate video into our content. For the past while, I've been shooting with a Canon 1d Mark IV (Drrrrrrrrrroooooooooooooooooooooool) experimenting with video. Thought I'd share some of my thoughts, and more important, the results.

FIRST IMPRESSIONS
To be honest, I wasn't all that keen on video. I've been a photographer a long time, and to me, the still image is one of the most powerful ways to tell a story. There have been many occasions however when the still image can't tell the story a way a moving image can.

FIRST SHOOTING
So my first time, I was playing around with the camera at Reversing Falls in Saint John. Experimented shooting handheld versus monopod versus tripod...no questions tripod wins every time. Handheld is too shaky, monopod is a bit better, but tripod easily provides the steadiest video. The video is here:


As you can see, I was playing around with focus, apertures and depth of field. It's interesting shooting with different apertures and getting the proper exposure with the shutter speed. I definitely love having that control to get different effects. I've gotten pretty good with the shot using shallow depth of field, focusing farther in the scene, then focusing on a closer object. Well, it took a few takes to get the good final clips of course...
One thing that sucks is the lack of autofocus during shooting...if you try to autofocus, the exposure goes crazy. So you are basically forced to use autofocus.
i tried to shoot rugby, but it didn't really work as I was trying to both zoom and manually focus.

WINDSURFING
Happened upon some fellows taking advantage of the wind on the Kennebecasis River to windsurf. Playing around with different clips, including my first interview. At this point I didn't know how extract audio from clips for a voiceover in iMovie. Good example of how crappy the on-camera microphone is too.


EDITING
Editing the video is a whole other ball of wax. Since I'm not sure how much editing I'll be doing at work, or what kind of software we will be using, I chose iMovie to start off. Pretty easy to figure out interface, and just started going at it. Not a bad program to use for basic stuff.

SCOUTREES PLANTING
The next video was shot of members of my son's Cub troop planting trees at the qplex trails. For this one, I decided to try mixing in interviews with the clips. I also figured out how to do voiceovers, add titles, and transitions!


Overall, it took about 45 minutes to shoot the clips, then about three hours to download, edit, and export. This was mainly because I have no idea what I'm doing really.

PETER BUCKLAND GALLERY

The next video project was a story of Gallery Glance piece...a short clip about an show at a gallery. Peter Buckland has always been open to have pictures taken, so I figured he go for it.
The idea was to have images of the art, with an interview clip, and information about the artist or artwork.


I was pretty happy with how the clip turned out, it's something that could be a regular feature maybe for the arts page of the new website.

THE BIRTHDAY CAKE CAPER
This last video has absolutely no relation to anything I'll be doing for work, but it was my birthday, we were at my brother-in-law's, so I thought I'd have some fun.


It was a really good editing exercise, and it was fun to do. I hope you enjoyed it! I'm thinking of some sequel ideas if I have some time...

SOME TIPS
I've still got lots of learning to do, but here are some tips for anyone looking at shooting video with your DSLR. Once I get more proficient in it, I will probably start doing some slr video workshops.

1) USE A TRIPOD. Only way to get steady video
2) Use an external microphone if you can. The on camera microphone picks up way too much background noise, including your movements and clicking of dials.
3) Get BIG memory cards. If you are shooting HD, it doesn't take long to fill up a card. 16GB is pretty much the minimum.
4) Avoid zooming and panning, unless you are filming a moving subject.
5) Don't use auto white balance. Choose the right balance and leave it. If you use auto white balance, the colors will change and the clips won't match.
6) Make sure you have batteries in your microphone (not from personal experience, but a lesson learned by an photo intern who shall remain unnamed....)
7) It's hard to see the LCD outside, so I would recommend getting a hoodman cinema kit or the loupe to make it easier to focus. http://www.hoodmanusa.com/hdvp.asp

Tuesday, March 8, 2011

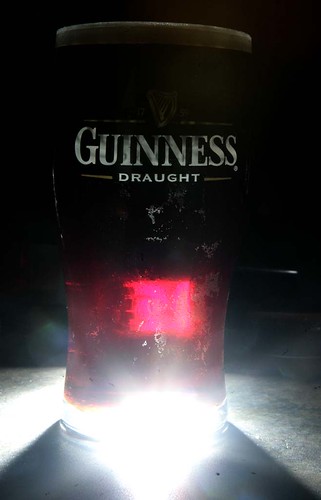
I've been pretty lax with assignments, I apologize...Today I had an assignment to shoot a glass of Guinness...and had some fun with it. So i thought, why not make it an assignment!!!

So, the assignment is to photograph your favourite beverage in a creative way!

A couple of suggestions:

LIGHT
This is the important one. Depending on your drink, you may be able to get some really cool effects by shining light through it.

The photo above was taken with the flash directly behind the glass. You'll need to be able to trigger your flash off camera (I used pocketwizard's to trigger the flash)

Here's another one with the flash pointed downward a bit more:


You may want to try using cardboard or a snoot to focus the light on the beverage so it doesn't spread around too much.

You could also achieve this effect by putting the beverage in front of a window.
Make sure you meter for the inside light on the glass when using NATURAL LIGHT.

I also did some interesting shots with:

Flash held directly above:


Off camera flash cord, bounced off the ceiling:


Again, with the off camera cord or wireless triggering, but this could also be done using a lamp or spotlight with the camera on a tripod.

This was a cool one I did for a story about water quality:


You could also try some slow shutter speeds and zoom, pan, rotate.

There is a folder under assignments here:
http://www.learnphoto.ca/gallery/v/group/assignments/myfavbev/

Create a new album and upload your pix!

Have some fun, if you have any questions, fire me an email! nchenier@nbnet.nb.ca

Wednesday, February 2, 2011

2010 Learnphoto.ca Photographs of the Year-Public Vote!

Just for fun, I've decided to have a separate voting for the 2010 Learnphoto.ca Photographs of the Year and let the general public vote!

head to: http://www.noelchenier.ca/GALLERY/2010photosofyear

Take a look, and vote for the four shots you think are the best! Forward this to anyone who enjoys photography and might be interested in casting their ballot, tell your friends to vote for you pix, even if you’ve voted in the contest for members of learnphoto, feel free to do so again!

I’ll have voting on until Sunday February 13th and announce the winner on Monday Feb 14th!

Noel

----------------------
Photographer and teacher
LEARNPHOTO.CA, Noel’s online photography learning community!
http://www.learnphoto.ca
Portfolio
http://www.noelchenier.ca
Noel’s Photo Tips Blog
http://noelchenier.blogspot.com
Work Done by My Students!
http://www.learnphoto.ca/gallery
Contact Email:
nchenier@nbnet.nb.ca
Contact Phone:
608-6424

Tuesday, August 31, 2010

Invitation to the opening of SAINT JOHN: A PORTRAIT, photographs by my talented students!


It is my pleasure to invite you to the opening of SAINT JOHN: A PORTRAIT, featuring the work of my talented photography students.

These 24 images document Saint John, from it’s architecture to beautiful natural wonders, to the grit of the industrial areas.

The opening is Thursday, September 2nd, from 6pm-7pm at the Saint John Free Public Library. The exhibit will be on display for a while, so if you can’t make it then, I hope you get a chance to take a look!

The exhibit features the work of:
JESSICA MIDDLETON, JANIQUE VALLIS, NEIL ROBICHAUD, VERONICA CAISSIE, M.J. GODDARD, CATHY ANDERSON, ADAM CAISSIE, SHANE CUNNINGHAM, JILL CARLETON, DIANA ALEXANDER, SEBASTIEN BENOIT, EVELYN SABBALUCA, JIM MOORE, KELLY MARINO LYNNE BREEN, CHERYL D. RUSSELL, CANON JIM IRVINE, CATHY HEALY, JOAN SMALL, KELLY GRIFFITH, JANE BARRY, ANNETTE LAMB, PATRICIA RYAN, AND IAN HAMILTON.

Hope to see you all there!

Noel Chenier
----------------------
Photographer and teacher
LEARNPHOTO.CA, Noel’s online photography learning community!
http://www.learnphoto.ca
Portfolio
http://www.noelchenier.ca
Noel’s Photo Tips Blog
http://noelchenier.blogspot.com
Work Done by My Students!
http://www.noelchenier.ca/GALLERY
Contact Email:
nchenier@nbnet.nb.ca
Contact Phone:
608-6424

Wednesday, February 3, 2010

Entering a photo contest? READ THE FINE PRINT

A while back, a photographer on a discussion forum posted how happy he was that a photograph he had taken was in the running to be published in National Geographic Magazine in their YOUR SHOT feature.

On first glance, who wouldn't want the opportunity to be able to say they had a photograph published in one of the most well known magazines in the world that features work by amazing photographers?

A closer look at the rules and terms at the contest however, should give you pause.

Read the FAQ on the contest (http://ngm.nationalgeographic.com/your-shot/faq):

When I submit a photo to Your Shot, do I retain the copyright to the photograph?

By submitting a photograph to Your Shot you will always retain ownership of the copyright. What you will grant National Geographic is a royalty-free, worldwide, perpetual license for that photograph. Please read through the Your Shot rules for more information on the rights you grant when submitting a photograph to Your Shot. "

Followed by the terms of service (http://www.nationalgeographic.com/community/terms.html):

5. For clarity, you retain all of your ownership rights in material you upload, comments you post, or other content you provide to the Site (“User Content”). By uploading User Content, you grant National Geographic (which includes its subsidiaries, affiliates, joint venturers, and licensees) the following rights: a royalty-free, worldwide, perpetual license to display, distribute, reproduce, and create derivatives of the User Content, in whole or in part, without further review or participation from you, in any medium now existing or subsequently developed, in editorial, commercial, promotional, and trade uses in connection with NG Products. National Geographic may license or sublicense, in whole or in part, to third parties rights in User Content as appropriate to distribute, market, or promote such NG Products. An NG Product is defined as "a product of National Geographic, a subsidiary, affiliate, joint venturer, or licensee of National Geographic, in any language, over which National Geographic has "Editorial Control." For the purposes of this Agreement, "Editorial Control" means the right to review, consult regarding, formulate standards for, or to exercise a veto over the appearance, text, use, or promotion of the NG Product. You also agree that National Geographic may make User Content available to users of the Site who may display and redistribute it in the same way that National Geographic makes all other Content available.

Basically, this means that you are giving National Geographic the right to use your image as much as they want, however they want, whenever they want, make as much money as they want off the image, as well as allowing anyone else they give the rights to as well...
So you could submit an amazing photograph that gets published in the magazine, a book collection, advertisements, put on t-shirts, mugs, etc, and all you get is a tear-sheet of your image in National Geographic and bragging rights.

Contests like this are a way for National
Geographic and other magazines, websites, etc, to get free content to exploit as they see fit.

To make this particular rights grab even worse, they have put together a bunch of YOUR SHOTS into a special collectors edition!

http://ngm.nationalgeographic.com/your-shot/custom-cover-home

And it costs $11! So even if you had a shot published in it, you get to PAY for a copy!

And for an extra $8, you can upload your picture and have it on your specially made edition!

Check out the international photo competition and it's the same thing... even the kids contest for crying out loud!

ENTRANT LICENSES/RELEASES

By entering the Contest, all entrants (and their respective parents and legal guardians) grant a royalty-free, irrevocable, perpetual, non-exclusive license to Sponsor, its designees, licensees and affiliates (“Authorized Parties”), to reproduce, distribute, display and create derivative works of the entries (along with a name credit) in connection with the Contest and promotion of the Contest, in any media now or hereafter known, including, but not limited to: Display at a potential exhibition of winners; publication of a book featuring select entries in the Contest; publication in National Geographic Kids Magazine or online highlighting entries or winners of the Contest. Entrants consent to the Sponsor doing or omitting to do any act that would otherwise infringe the entrant’s “moral rights” in their entries. Display or publication of any entry on an Authorized Party’s website does not indicate the entrant will be selected as a winner. Authorized Parties will not be required to pay any additional consideration or seek any additional approval in connection with such use.


Any time you want to enter a contest, check the rules and terms..you might be surprised what you find...in some cases, you are actually giving up the FULL COPYRIGHT on your image, meaning the contest holder could SUE you if you put the image on a website or sold it. nice huh?

Mark Loundy writes about the photo business and posts a regular column relating to rights and photography. In his column he has the GOOD, the BAD, and the UGLY. Some of the uglies just make me shudder!