Sunday, November 16, 2008

Some Recent Work Posted on my gallery

Hello all. Posted some more recent photos taken for the Telegraph-Journal on my student gallery(It's only fair that since I expect my students to post that I post too...don't want to be a hypocrite!) Posted some info on the pix too!

View em here:

http://www.noelchenier.ca/GALLERY/2008noelpix

While you are there, please take some time to browse some of the great photos taken by my students! There are some awesome images there.


Tuesday, November 11, 2008

Remembrance Day Photographs

I happened to be looking through images relating to Remembrance Day and came across a few images I'd thought I'd share.

The top photograph is of Veteran Art Pottle, who fought with the 1st Special Service Force, AKA The Devil's Brigade, during WWII in Italy and Southern France. It was taken at the New Brunswick Museum in Saint John in November of 2006 to go along with a story about a war themed exhibit at the museum. The assignment was to get Art with the exhibit, but I thought I'd try to get an interesting portrait as well.

For lighting, I used a Canon 580 flash on slave mode a stand with a snoot to create a spotlight effect. The snoot also prevented light from hitting anything in the background and created the darkness. I placed the flash high and to the left of Art, and tilted it down to create the directional light. I used the on camera flash as a master, set to 1/128th power and bounced off the ceiling so the light would not be exposed by the camera.

I also came across a picture that I took ten years ago at Remembrance Day ceremonies in Fredericton. It is a picture of 2nd Lt John McNair as he looks towards the sky during the moment of silence. When I look at this picture, I really feel that I captured was this day is all about-the lines on the face, the expression of sorrow as he looks towards the heavens, the rain drops on his glasses, to me, that all says Remembrance Day.


Monday, November 10, 2008

What the #$%^ Did the Lab Do To My Picture?!?!?!

Ever take a photograph to get printed at the lab, and it comes back squished(image above) or cropped completely different from how you cropped it? I'm going to help you prevent that from ever happening again!
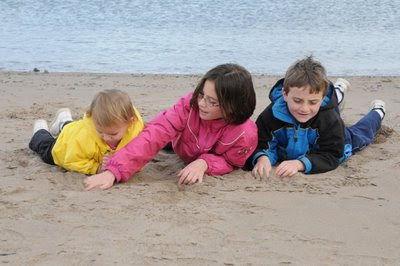
So here is my original photo. Nice enough picture of my three munchkins at the nature park, but I want to get rid of the excess sand and water. So in Photoshop, I get out my crop tool and crop it panoramic.
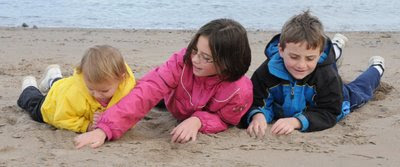
There. Much better, really focuses on them. So I take my card to my favorite lab to get a 4"x6" print made. And what I get back is this:
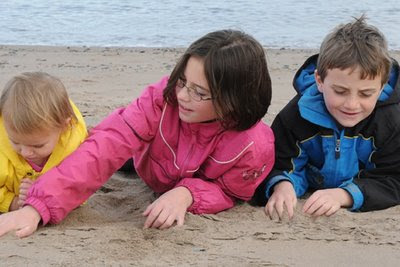

An image totally cropped in. Or THIS!!!!!
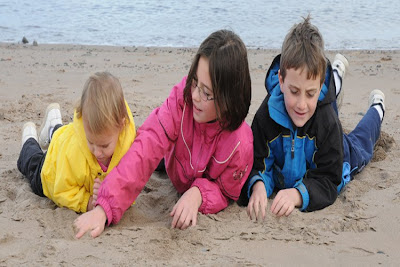
An image where they have been squished! What the heck went wrong?

A full frame image is the same height/width ratio as a 4"x6" print. By cropping an image, I've just made it a completely different ratio. So, the machine printing the image will either crop out parts to make it fit that ratio, or squish or stretch the image to make it fit that ratio. You need to take a few seconds to prepare the image before saving it so that it will print correctly!

HOW TO RESIZE IMAGES PROPERLY!

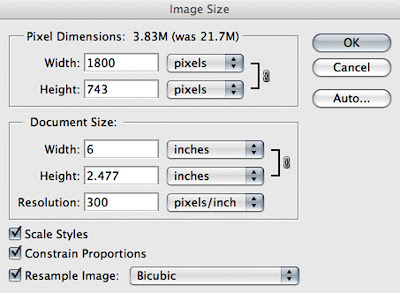
Step 1: RESIZE THE IMAGE

In Photoshop CS-CS4, select IMAGE->IMAGE SIZE. (IMAGE->RESIZE->IMAGE SIZE in Elements). The Image Size box will appear. If the image is a horizontal, select the WIDTH and type in the width of the print you want(In this case, we are doing a 4x6, so I type in 6. If the image was vertical, I'd select the height first). By selecting 6", you can see the Height went to 2.477". If I were to leave it like this, I'd get the squished or cropped print.

Step 2: INCREASE THE CANVAS SIZE

This is the key second step. In Photoshop CS-CS4, select IMAGE->CANVAS SIZE. (IMAGE->RESIZE->CANVAS SIZE in Elements) The Canvas Size box will appear. Make sure that RELATIVE is UNCHECKED.
Now, I will type in 4" for the HEIGHT(or change the width if the image was a vertical). Then I pick my CANVAS EXTENSION COLOR(WHITE or BLACK). Then click OK.
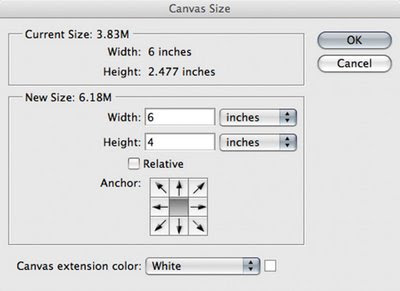

And there you go! The image below is now 2.477"x6", but fits on a 4"x6" canvas! So my print will not be cropped or squished, it will print correctly!
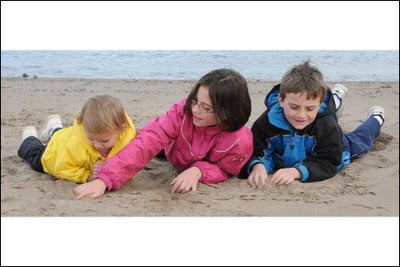

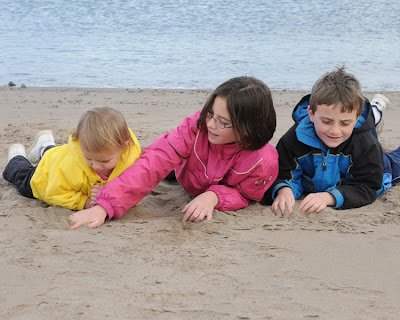
One other thing to mention! 8"x10" is considered a standard size for making a larger print. However, this is not the same ratio as the full frame captured! The same ratio print would be an 8"x12"! So if you print a frame 8"x10", you end up losing an inch on either side of the frame!
The image below was printed 8"x10" instead of 8"x12"and I lost the edges.

CROPPING TO THE RIGHT SIZE
To ensure your print is the exact size you want, use the CROP tool and set a specific size that you want it to crop to!
Pick the CROP tool, then type in the HEIGHT, WIDTH, and RESOLUTION (200-300) that you want. So below, I put in a width of 12 inches, height of 8 inches, and resolution 250. Then I use the crop tool and select the part of the image I want and it's ready to print at the right size!

Then when I send the picture to the lab, and TELL THEM TO PRINT 8"x12", you get a full frame image on an 8x12!
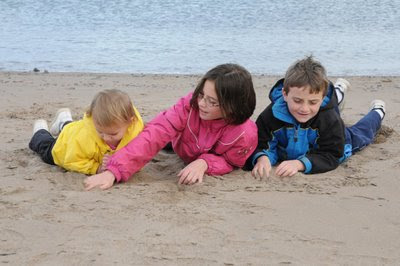
There! Now you should be able to get the exact size prints you want from your favourite lab, with no squishing, stretching, or cropping!

Happy shooting!

Noel Chenier
www.learnphoto.ca
Connect with Noel on:
INSTAGRAM: http://www.instagram.com/nchenier
TWITTER: @noelchenier http://www.twitter.com/noelchenier

I hope you find these tips useful!
If so, it would be awesome if you would check out my Photography Assignment Generator Apps on the app store, a unique photography app that's meant to inspire you to take great photos! Perfect for anyone taking part in a Photo 365 challenge, there are over a hundred individual assignments and hundreds of thousands of potential random ones. Versions available for iPhone/iPod and iPad, including free versions so you can try them out! Full details, including reviews and tour videos of the apps can be found at www.learnphoto.ca/apps

Even if you only download the free version that would help get it up the app store lists!


Monday, November 3, 2008

Upcoming Photoshop/Studio Portrait/Advanced Flash Courses!

I've set the dates for my next slate of weekend courses. Please take a look and if you are interested in attending, please contact me via the methods below. For those in Fredericton, as soon as I know if there are any carpool opportunities I will let you know.
Please feel free to forward the info on to anyone else who may be interested.

1)Beginner Photoshop for Photographers
2)Studio Portrait Workshop

3)Advanced Flash Workshop


1)Beginner Photoshop for Photographers

Two Day Course, Sunday Nov 16, Sunday Nov 23 9-4:30pm on both days
Location: V.A. Snow Centre, Hamton(tentative)
Cost: $150, includes a comprehensive manual complete with all information/techniques covered with illustrations.

About the Course
As a user of Photoshop on a daily basis over the past ten years, I will teach you all the basic Photoshop tools and techniques you can use to manipulate and enhance your images.

During the course, you will learn
-all the basic tools(crop, selection, move, brushes, etc)
-how to resize images for various uses(print, email, online)
-the various file formats and when to use them
-how to use layers to combine images
-adding text to images
-proper techinques and tools to retouch, adjust, color correct, and sharpen
your images
-retouching old photographs
-how to hand color images

and tons of other fun and creative ways to make your photographs look great!

Assignments will be given to complete during the week between classes to give you time to work on the skills and knowledge gained.

To see some of the images created during my last workshop go here:
http://www.noelchenier.ca/GALLERY/photoshop

Required for the course:
-A mac or PC laptop with the following software installed
-Photoshop CS/CS2/CS3/CS4
or Photoshop Elements version 5.0 or higher
If you have not yet purchased a version of photoshop, you can download
demo software here: www.adobe.com
(you will need to register for an adobe ID, but you then can get access
to lots of stuff) NOTE-THE DOWNLOADS ARE A THIRTY DAY TRIAL, WHICH STARTS ONCE YOU DOWNLOAD THE DEMO, NOT WHEN YOU INSTALL IT. SO IF YOU ARE GOING TO USE THE DEMO VERSION, DOWNLOAD IT THE WEEK BEFORE THE COURSE!
-images, and lots of em! Pictures of people, textures, etc. A full list of
required shots will be given, I will also provide examples for students to
work on.

2)Studio Portrait Workshop


Ever wanted to take a great portrait like the ones done by professional portrait photographers? Now is your chance.

During this one day course you will be introduced to the various equipment and techniques used to create professional quality portraits. You will learn standard and creative lighting techniques, use a variety of backdrops, and learn how to pose a subject.

The morning will be spent going over the equipment and techniques, then you will use what you've learned and photograph people at the various set ups. Depending on how much interest there is, we will have two 3 hours shooting sessions for each group, one from 12-3, and another fom 3-9pm. Lighting equipment is being supplied by Appleby's Image Source of Saint John www.applebys.com

Required for the course
Film or digital SLR
Subjects to pose for your portraits

For some examples of the kinds of photographs we'll be taking, browse:
http://www.noelchenier.ca/GALLERY/light
http://www.noelchenier.ca/GALLERY/rvalley
http://www.noelchenier.ca/GALLERY/rvalleyselect

Where: Our Lady of Perpetual Help Church, Rothesay
When: Saturday Dec 6th
Times: 9am-12pm as a group, then
First shoot session from 12-3pm, second shoot session from 3-6pm
Cost: $100

3)Advanced Flash Workshop


Want to take better photographs with your flash? Not happy with the results you are getting? Then attend one of my advanced flash workshops!

Topics we will cover include:
-Use of TTL and manual exposure modes with your flash to get proper exposure.
-off camera and wireless flash, how and what accessories are needed to do it and use it effectively
-using multiple flashes
-creative lighting with flash
-balancing flash with ambient light
-balancing flash with different lighting temperatures(flourescents, tungstens)
-use you flash as a studio light
-using flash outdoors

We will go over the various techniques and set ups, then pair up and take photographs using them at a variety of stations I will set up in the large room.

For some examples of the kinds of photographs we'll be taking, browse:
http://www.noelchenier.ca/GALLERY/advancedflash
http://www.noelchenier.ca/GALLERY/advflash

Where: Our Lady of Perpetual Help Church, Rothesay
When: Saturday Dec 13th
Times: Two separate sessions 1)9am-3pm 2)3pm-9pm
Cost: $50

Required for the course

Film or digital SLR
At least one accessory flash(Nikon sb 800/600, Canon 580EX/420ex, Vivitar 283/285 etc)

Optional-any extra flashes or flash accessories(cords, slaves, etc) you own, even older ones from film cameras.
Tripod

To register for a course contact Noel by any of the following methods

best- email: nchenier@nbnet.nb.ca
Phone: 657-FOTO(3686)

Head to http://www.learnphoto.ca/ for more info on the courses, student
testimonials, etc.

To see some of the awesome work done by some of my students, head to
http://www.noelchenier.ca/GALLERY/

ABOUT NOEL CHENIER
Noel Chenier is an award winning staff photographer for the New Brunswick
Telegraph Journal. His work has appeared in newspapers and magazines across
North America, and can be viewed on his website at http://www.noelchenier.ca
Noel has a Bachelors of Adult Education from the University of New
Brunswick and was previously a part time photography instructor at the New
Brunswick College of Craft and Design in Fredericton.
_________________
Noel Chenier
----------------------
Photographer and teacher
Portfolio
http://www.noelchenier.ca
Photography Courses Website
http://www.learnphoto.ca
nchenier@nbnet.nb.ca

Wednesday, October 29, 2008

Tips for Great Halloween Shots-Pumpkins, Costumes, etc!

Since Halloween is upon us, I thought I'd give out some tips on how to get some great pumpkin, costume, and other pix!

PUMPKING PIX
Great pumpkin shots are easy to do! Light em up with a candle and fire away, right? Sure, but you will have to do the proper metering to get the best shots. If you go with just what the meter wants, chances are you will get a pumpkin that is too dark on the exterior and too bright inside(photo on left). Instead, you could meter from the exterior skin of the pumpkin(get in close and fill the frame with only the pumpkin skin, or use your spot meter) or set your +/- in the PLUS, to get the middle photo. If you want just the light from the pumpkin, then you take your meter reading more from the light inside the pumpkin(get in close and fill the frame with only the light in the pumpkin, or use your spot meter) if using Manual(M) mode, or if you are using Shutter(TV/S) or Aperture Priority(A/AV) mode you will most likely have to set your exposure compensation(+/-) to the MINUS, probably -1 or -2. Remember to see it back to zero when you are done!
You may want to turn the lights down in the room to get more darkness. Also, a candle will give a warmer light than LED's. To really warm up candle light, set the white balance to DAYLIGHT, or use TUNGSTEN if it's too warm. If you find your LED light is too cool, try using SHADE or OVERCAST white balance to warm it up.
You will also need to use a tripod as the light will be very low and your shutter speeds will be slow. So you could also try zooming and panning to get some neat effects!

COSTUME SHOTS

To get some great costume shots, I would suggest finding a nice plain wall you can stand the subject against. Then, use a flash bounced off the ceiling to get a softer light that won't cast dark shadows against the wall.
You are wondering, Noel, how did you get that old kind of look on those pics? Well, they were taken using an old twin lens film camera, and I basically shot blindly with the flash with what I thought would be a good exposure and ended up underexposing every shot. So the old look is basically underexposed film printed lighter then scanned and worked a bit in photoshop. No, that wasn't what I wanted to do. But when life gives you lemons, make lemonade....they look fine in black and white of course...

Obviously if you are going to get shots of the kiddies out in their costumes, you will have to use flash as it will be very dark. Use MANUAL shooting mode(M), set the shutter speed to 60th/second and pick an aperture of F8, pop up the flash and use the flash exposure compensation if it's too bright or too dark. If you want to try to get some more ambient light, turn the shutter speed lower(1/15th or 1/8th) to get more light and some funky blur.

MONSTER LIGHTING!

If you want some spooky shots, use MONSTER LIGHTING! You want to have a light source that comes from below, either a high powered lamp, flashlight, or your flash. Place it right underneath the subject's face so you get lots of creepy shadows, as get them to make a scary face. If you are using a lamp or flashlight, make sure that you take your meter reading more from the brighter areas(zoom in on them or use your spot meter) if using Manual(M) mode, or if you are using Shutter(TV/S) or Aperture Priority(A/AV) mode you will most likely have to set your exposure compensation(+/-) to the MINUS, probably -1 or -2. Remember to see it back to zero when you are done!
If you are using your flash, you will need to use an off camera flash cord or trigger it wireless and hold it under the person's face. Try a manual setting of 60th/second at F16 or F22, and adjust the flash power as necessary!

Good luck, and Happy Halloween! Post some pix on the gallery if you get some good ones!


Tuesday, October 28, 2008

PIXELS TO PRINT: THE ART OF PHOTOJOURNALISM the BOOK! Only $20

Need to finalize how many people are interested in getting copies of Pixels to Print: The Art of Photojournalism. Due to the number of copies already requested, the price will now be only $20, which will include shipping and taxes. If you would like copies, please let me know how many by MONDAY November 3rd. It will take about two weeks for them to arrive. It would be a nice Christmas gift for anyone who likes photography!

If you are interested, please reply to me at nchenier(at)nbnet.nb.ca, and forward this info on to anyone else you think may be interested!

About the book:
As many of you know, myself and my photo colleagues at the Telegraph Journal recently had an exhibit of our work, Pixels to Print: The Art of Photojournalism in Saint John and Fredericton. The book is a catalogue of every image in the show. The book is 7" high by 9" wide, full colour printing.

You can view a preview of the book here:
http://www.lulu.com/browse/preview.php?fCID=2742421

***NOTE-DO NOT CLICK ON ADD CART! If you order through the website, you will have to pay for full shipping and taxes as well!****

Exact specs:
9" x 7", perfect binding, white interior paper (80# weight), full-color interior ink, white exterior paper (100# weight), full-color exterior ink


Thanks

Noel


Tuesday, October 21, 2008